Breaking

Author: admin

  • How to Fix a Running Toilet Without Calling a Plumber

    How to Fix a Running Toilet Without Calling a Plumber

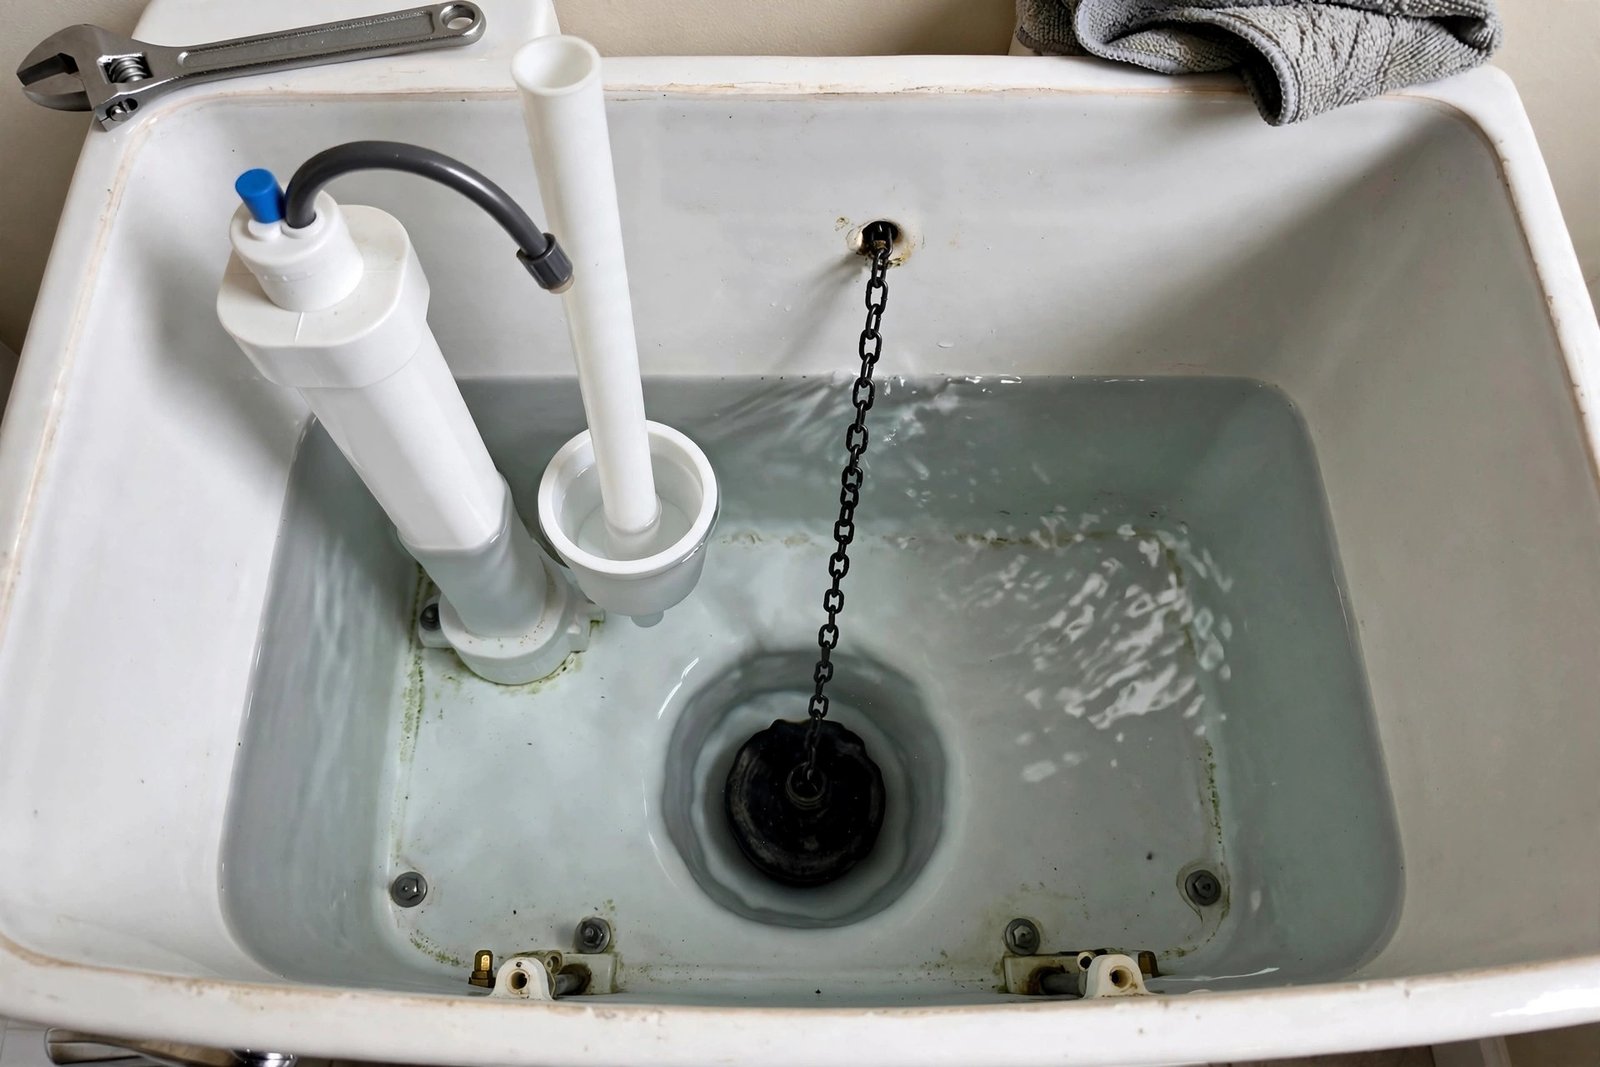
    A running toilet is almost always a $5–$15, fifteen-minute fix: nine times out of ten, the culprit is a worn-out flapper or a misadjusted fill valve inside the tank. No special skills, no soldering — just the tank behind the bowl, an inexpensive part from any hardware store, and the steps below. A running toilet can waste up to 200 gallons of water a day, so every week you wait is money swirling down the drain. Let’s diagnose yours and fix it today.

    Step 1: Diagnose What’s Actually Running

    Take the tank lid off (lift straight up with two hands — heavy porcelain) and look inside while it runs. Then do the food-coloring test: drop a few drops of food coloring into the tank water and don’t flush for 20 minutes. If color appears in the bowl, water is leaking past a bad seal — that’s a flapper problem, the most common cause and the easiest fix.

    The three usual suspects

    • Worn flapper (most common): the rubber seal at the tank’s bottom. After 3–5 years, chlorine and minerals warp or crack it, so water seeps into the bowl and the tank endlessly refills. Signs: failed food-coloring test, or the tank refilling in short bursts every few minutes (“phantom flushes”).
    • Fill valve set too high or failing: the tall column that refills the tank. If the water level sits above the overflow tube, water pours continuously down the tube. Signs: visible flow into the hollow overflow pipe in the tank’s middle.
    • Chain or float issues: a tangled chain holds the flapper slightly open; a waterlogged float can’t shut the valve off. Signs: jiggling the handle temporarily stops the running.

    The EPA’s WaterSense program ranks a constantly running toilet among the biggest household water wasters — fixing it is one of the highest-impact repairs in your home.

    Step 2: Gather What You’ll Need

    • Universal replacement flapper ($5–$10 — take the old one to match 2-inch vs. 3-inch)
    • Possibly a fill-valve kit ($10–$15) if the diagnosis points that way
    • An old towel, a cup or sponge, and rubber gloves
    • Adjustable wrench or pliers (only for fill-valve replacement)

    Shut off the water first: turn the oval valve on the wall behind the toilet clockwise, then flush to drain the tank. If that shutoff is frozen — common in older homes — you can still swap a flapper with the water on, but fill-valve work needs the supply off.

    Key takeaway: Diagnose before you buy. The food-coloring test tells you in 20 minutes whether you need a $5 flapper or a $12 fill valve — guessing wrong just means a second trip to the hardware store.

    Fix 1: Replace the Flapper (the 10-Minute Fix)

    This solves the majority of running toilets. This Old House’s walkthrough has photos if you want a visual reference.

    1. Remove the old flapper. Unhook the chain from the flush-lever arm, then slide the flapper’s tabs off the pegs on the overflow tube. Note how it was attached — you’ll reverse this.
    2. Install the new one. Hook the tabs onto the pegs, then connect the chain to the lever arm with about half an inch of slack. Too tight holds the flapper open; too much slack tangles underneath it.
    3. Turn the water on and test. Let the tank fill, then repeat the food-coloring test. No color in the bowl after 20 minutes means victory.

    Fix 2: Adjust or Replace the Fill Valve

    If water flows into the overflow tube, try the free fix first: the water level should sit about one inch below the top of the overflow tube. On modern valves, squeeze the float clip and slide it down; on older ball-float arms, gently bend the arm down or turn the adjustment screw. Flush and watch — the tank should fill to the lower level and shut off completely. Fluidmaster’s support site has diagrams for every major valve type, and Family Handyman’s guide shows the process close-up.

    If adjustment fails — constant hissing, painfully slow filling, or a valve that never shuts off — the internal seal is shot. Replacement:

    1. Shut off the supply, flush, and sponge out remaining water.
    2. Disconnect the supply line under the tank (towel underneath — it will drip).
    3. Unscrew the plastic lock nut, lift out the old valve, and drop in the new one set to the same height. Hand-tighten, then a quarter-turn with pliers — overtightening cracks the tank.
    4. Reconnect the supply line and the refill tube, turn the water on, and set the level one inch below the overflow tube.

    Troubleshooting: When the Simple Fixes Don’t Work

    • New flapper, still running? Feel the flush-valve seat (the rim the flapper sits on). Mineral buildup or pitting prevents a seal — smooth it lightly with fine sandpaper.
    • Water keeps trickling after the fill? The refill tube may be pushed too far into the overflow pipe, siphoning continuously. It should clip above the waterline.
    • Water on the floor? That’s a different problem — supply-line connection, tank bolts, or the wax ring. Tank bolts are still DIY; a failed wax ring is the one toilet job where calling a plumber is reasonable.

    When to Actually Call a Plumber

    Call a professional for a cracked tank or bowl (porcelain cracks can burst), a broken shutoff valve you can’t turn, or a toilet that still runs after both the flapper and fill valve are replaced — that points to a cracked overflow tube or damaged flush-valve seat requiring tank removal. Expect $150–$300: worth it only when the job genuinely exceeds the tank.

    Conclusion

    A running toilet is a parts problem, not a plumbing problem — a $5 rubber flapper or $12 fill valve that wore out after years of service. Diagnose with the food-coloring test, buy the right part once, and you’ll finish before a plumber returns your call, while stopping up to 200 gallons a day from going to waste. For more money-saving home fixes, browse our home improvement section — and if this saved you a service call, learn about our team or suggest the next guide.

    Frequently Asked Questions

    How much water does a running toilet waste?

    Up to 200 gallons per day — over 6,000 gallons a month, enough to easily double a typical water bill. Even a silent leak found only by the food-coloring test wastes significant water over time.

    Why does my toilet briefly refill every few minutes?

    Those “phantom flushes” mean water is slowly leaking past a worn flapper into the bowl; when the tank level drops, the fill valve tops it up. A new flapper almost always fixes it.

    Must I shut off the water to replace a flapper?

    Not strictly — you can swap a flapper with the tank full. But shut off the supply for a fill-valve replacement, since that involves disconnecting the water line under the tank.

    How do I know if I need a 2-inch or 3-inch flapper?

    Measure the flush-valve opening, or bring the old flapper to the store. Easiest: buy a universal adjustable flapper ($8–$10), which fits the vast majority of residential toilets.

    Why does jiggling the handle temporarily stop it?

    Jiggling reseats a flapper held slightly open by a tangled or over-long chain. It confirms the diagnosis but it’s a workaround, not a fix — replace the flapper and set the chain slack to about half an inch.


  • Safest Way to Store Crypto Long Term for Beginners

    Safest Way to Store Crypto Long Term for Beginners

    The safest way for a beginner to store crypto long term is a hardware wallet — a small physical device that keeps your private keys offline — plus a handwritten seed-phrase backup stored somewhere secure. That’s the whole answer. Everything below explains why it beats every alternative, how to set one up without the classic beginner mistakes, and how to protect the backup phrase that is, quite literally, the keys to your money. Remember one rule above all: buy the wallet from the manufacturer, write the recovery phrase by hand, and never type it into any website or app.

    Why “Not Your Keys, Not Your Coins” Matters

    When you buy crypto on an exchange and leave it in your exchange account, you don’t hold the crypto — the exchange does, and it owes you an IOU. Usually that IOU is honored. But crypto history is a graveyard of exceptions: Mt. Gox collapsed in 2014 with 850,000 customer bitcoins, and FTX imploded in 2022, freezing billions in customer deposits overnight. In both cases, ordinary users discovered they were unsecured creditors in a bankruptcy.

    Long-term means years, and over years the question isn’t whether your exchange is trustworthy today — it’s whether it will still exist, unhacked and solvent, in 2030. Self-custody removes that question. Your coins live on the blockchain; what you store is the private key proving ownership. A hardware wallet keeps that key on a device that never touches the internet, eliminating remote hacking entirely. As the SEC’s investor education site warns, crypto platforms can fail or freeze withdrawals — and unlike bank deposits, there is no FDIC insurance on your coins.

    Your Storage Options, Ranked Safest to Riskiest

    1. Hardware wallet (cold storage) — the gold standard

    A USB-sized device (Ledger, Trezor, and similar) that generates and stores your private keys on a secure chip, isolated from the internet. You physically confirm transactions on the device’s screen; malware on your computer can never extract the key. Cost: roughly $60–$150, one time. For anyone holding more than a few hundred dollars long term, this is the correct answer.

    2. Paper or steel seed-phrase backup — the essential companion

    Every wallet generates a 12- or 24-word recovery phrase at setup. This phrase is your wallet: anyone holding it can recreate the wallet anywhere and take everything. Written on paper in a safe or safe-deposit box — or stamped into steel to survive fire and flood — it’s your disaster recovery. It’s the backup, not a daily-use method.

    3. Software wallet on your phone (hot wallet) — fine for small amounts

    Free apps like those listed on bitcoin.org’s wallet chooser and ethereum.org’s wallet directory give you your own keys, but the keys live on an internet-connected device exposed to malware and theft. Reasonable for a few hundred dollars of spending money; wrong for a retirement-sized stack.

    4. Leaving coins on an exchange — the riskiest for long term

    Exchanges are fine as on-ramps: buy there, then move coins to your own wallet. Leaving significant money on one for years means trusting a single company’s security and solvency with no federal backstop. The FTC’s crypto guidance also notes scammers specifically target exchange accounts with fake support messages — self-custody shrinks that attack surface.

    Key takeaway: Match the storage to the stakes. Spending money can live in a phone wallet; anything you’d be devastated to lose belongs on a hardware wallet with an offline seed-phrase backup. The $80 device protects the $8,000 stack.

    Setting Up a Hardware Wallet, Step by Step

    Setup takes about 20 minutes. The order matters.

    1. Buy only from the manufacturer. Order direct from Ledger, Trezor, or the maker’s official site — never Amazon, eBay, or a reseller. Tampered devices pre-loaded with someone else’s seed phrase are a real scam, and this one rule prevents it.
    2. Verify the device is genuine using the authenticity check in the manufacturer’s setup software. If it arrives pre-initialized or with a recovery phrase already written in the box, stop — that’s a scam device.
    3. Initialize it yourself and write the seed phrase by hand. The device shows 24 words one at a time. Copy them onto the paper card in order, in pen, and double-check every word. No photos, no phone notes, no emailing it to yourself. Paper only.
    4. Set a strong device PIN. Most devices wipe themselves after repeated wrong PIN attempts — a feature, since your paper backup restores everything.
    5. Send a tiny test transaction first (a few dollars), verify it arrives, then move the rest.
    6. Store the seed phrase somewhere physically secure, separate from the device — a home safe, a safe-deposit box, or a trusted relative’s safe in another location. A burglar or house fire shouldn’t be able to take both at once.

    Protecting Your Seed Phrase: The Real Security Game

    Once your coins are on a hardware wallet, the device is nearly unhackable — so criminals attack you instead. The seed phrase becomes the target:

    • No legitimate company will ever ask for your seed phrase. Not the manufacturer, not the exchange, not “support.” Anyone asking — in DMs, calls, or perfect-looking emails — is a scammer, full stop.
    • Never enter it on any website or app. The phrase is only ever typed directly into a replacement hardware wallet during recovery. Browser popups asking for it are phishing.
    • Don’t overcomplicate the backup. Advanced users split the 24 words across two locations, but on day one, one genuinely secure location beats a clever scheme you’ll forget.
    • Tell one trusted person it exists. If something happens to you, your crypto dies with you unless someone knows the backup exists. Your estate plan should mention it — they don’t need to see the words.

    4 Beginner Mistakes That Lose Crypto Every Year

    1. Screenshotting the seed phrase. Cloud photo backups sync to servers you don’t control. One compromised cloud account and the coins are gone.
    2. Buying the wallet secondhand. The discount isn’t worth the risk of a pre-compromised device. Ever.
    3. Keeping everything on the exchange “for now.” “For now” becomes three years — then comes the withdrawal-freeze announcement. Move coins to self-custody the same week you buy them.
    4. Never testing recovery. Do a dry run with a small amount: restore from the paper phrase before trusting it with the full stack. Discovering you miscopied word #17 with $50 at stake beats discovering it with $50,000.

    Conclusion

    The safest long-term crypto storage for beginners isn’t complicated: a hardware wallet bought from the manufacturer, a handwritten seed phrase stored securely and separately, and the discipline to never type that phrase anywhere. That ~$80 device and twenty careful minutes eliminate exchange-collapse risk, remote-hacking risk, and account-freeze risk in one move. What remains — phishing, physical theft of the backup, your own forgetfulness — is managed with simple habits: buy direct, write by hand, store separately, tell one trusted person. Set it up right once, and your coins can sit safely for a decade. For more beginner-friendly money and technology explainers, explore our crypto section — and learn more about who writes our guides and how we research them. Questions? Our newsroom is happy to help.

    Frequently Asked Questions

    How much does a hardware wallet cost?

    Entry-level models run about $60–$80; advanced touchscreen models cost $150–$250. For anyone holding more than a few hundred dollars long term, even the cheapest reputable hardware wallet is money well spent.

    What happens if I lose my hardware wallet?

    Nothing, as long as you have your seed phrase. Buy a new device from the manufacturer, enter the 24 words during setup, and your coins are restored. The lost device is PIN-protected and wipes after repeated wrong attempts.

    Can a hardware wallet be hacked?

    Remote hacking is effectively impossible since the keys never leave the secure chip or touch the internet. Real attacks target the owner — phishing for the seed phrase or selling tampered devices — which is why buying direct and guarding the phrase matter most.

    Is it safe to keep crypto on a major exchange long term?

    Major US exchanges have strong security, but you still face hack risk, bankruptcy risk (as FTX showed), and freeze risk, with no FDIC insurance. Fine for active trading balances; unwise for a multi-year hold of significant money.

    Should I split my seed phrase across multiple locations?

    For large holdings, yes — two halves in separate secure locations means no single theft or disaster compromises the wallet. For modest amounts, one well-chosen secure location is simpler and safer than a scheme you might misremember.

  • Is Travel Insurance Worth It for Domestic US Flights?

    Is Travel Insurance Worth It for Domestic US Flights?

    Short answer: for most cheap domestic US flights, travel insurance is not worth it. If you paid $129 for a flight from Dallas to Denver, a $25–$40 policy adds 20–30% to your trip cost while covering risks that are already unlikely — or already handled by federal rules and your credit card. But there are specific domestic trips where a $30 policy is genuinely one of the smartest purchases you can make: expensive non-refundable itineraries, hurricane-season Florida travel, or trips with elderly parents. Here’s how to tell which kind of trip you’re planning.

    What Domestic Travel Insurance Actually Covers

    A standard plan bundles four protections, and understanding each one separately is the key to the whole decision.

    1. Trip cancellation and interruption

    The headline coverage: if you cancel before departure or cut a trip short for a covered reason — illness, a death in the family, jury duty, a natural disaster at your destination — the policy reimburses prepaid, non-refundable costs like hotel deposits and non-refundable airfare. Note the emphasis: changing your mind because you don’t feel like going is not covered unless you buy a pricey “cancel for any reason” upgrade.

    2. Travel delay

    If your flight is delayed beyond a threshold (commonly 6–12 hours), delay coverage reimburses reasonable extra expenses — meals, a hotel night, ground transport. It pays actual costs with receipts, not a flat bonus, and daily caps are usually modest ($150–$200).

    3. Baggage loss, damage, and delay

    Typical domestic plans offer $500–$2,500 for lost bags and $100–$300 for delayed ones. What most buyers miss: US airlines are already liable for mishandled bags on domestic flights under federal DOT rules, up to $4,700 per passenger. The insurance is mostly a faster, smaller top-up — not new protection.

    4. Emergency medical and evacuation

    The least valuable piece domestically for most Americans, because your regular health insurance already covers you in all 50 states. It matters if you’re uninsured, on a very high-deductible plan, or heading somewhere remote where an air-ambulance evacuation could cost tens of thousands — otherwise it’s nearly redundant.

    The Math: What It Costs vs. What You Get

    A comprehensive domestic policy costs roughly 4–8% of your total prepaid trip cost:

    • $250 budget weekend (cheap flight + refundable hotel): ~$12–$20 to insure. You’re mostly insuring a flight the airline would rebook or credit anyway. Almost never worth it.
    • $1,200 family trip (non-refundable tickets + prepaid Airbnb): ~$60–$95. The gray zone — the decision depends on the specific risks below.
    • $3,500+ trip (prepaid resort, excursion deposits): ~$140–$280. If anything goes wrong here, insurance earns its price many times over.

    The subtler math problem: insurance only pays for non-refundable losses. Most major US airlines now let you change standard tickets without change fees, and flexible hotel rates cancel free. If your bookings are refundable or changeable, you’re paying to insure money you could already get back.

    Key takeaway: Travel insurance protects prepaid, non-refundable dollars. Before buying, add up only the money you’d truly lose if the trip collapsed tomorrow. If that number is small — or your bookings are flexible — skip the policy.

    5 Trips Where Domestic Travel Insurance Is Worth It

    1. Expensive non-refundable itineraries

    A $4,000 Alaskan cruise-tour, a prepaid Hawaiian resort week, or a multi-city trip on non-refundable budget-airline tickets. Rule of thumb: if losing the money would genuinely hurt, insure it.

    2. Hurricane-season travel to Florida or the Gulf Coast

    Flying to Miami, Tampa, or New Orleans between June and November? One named storm can scramble flights for days. Standard cancellation coverage includes hurricanes — but only if you buy before the storm is named. Buying after the warning is like buying fire insurance while the house burns.

    3. Traveling with elderly parents or illness-prone kids

    Illness is the most common valid cancellation claim in the industry. If grandma has a health scare the week before the family reunion, cancellation coverage turns a $1,800 loss into a full reimbursement.

    4. Big-event trips: weddings, graduations, reunions

    Cross-country travel for your sister’s wedding with non-refundable everything carries financial risk plus emotional stakes. The “cancel for any reason” upgrade (50–75% reimbursement) is worth considering here even if you usually skip it.

    5. Fragile itineraries with tight connections

    Three flight segments, a 45-minute connection at Chicago O’Hare in January, and a prepaid ski condo waiting in Aspen — trip-interruption and missed-connection coverage were designed for exactly this.

    3 Trips Where You Should Skip It

    1. Cheap flights on major airlines

    A $149 round trip with free changes is nearly self-insuring. Worst case, you pay a fare difference to rebook — far less than insuring every cheap flight for a year.

    2. Trips booked on points or refundable rates

    Miles are usually redeposited for a small fee or free, and refundable hotels cancel free. Insurers pay out on cash losses, so a points-heavy trip has little insurable value.

    3. Trips your credit card already covers

    Many mid-tier and premium US cards include travel protections free when you pay with the card. Per NerdWallet’s travel insurance guide, typical benefits include up to $10,000 per trip in cancellation coverage, $500+ for 6-hour delays, and baggage benefits. The catch: you must charge the trip to that card. Spend ten minutes reading your card’s “Guide to Benefits” before buying any policy — it routinely saves travelers $30–$80 per trip.

    How to Buy a Good Policy Without Overpaying

    1. Buy within 14–21 days of your first trip deposit to unlock pre-existing-condition waivers and “cancel for any reason” upgrades.
    2. Insure only non-refundable costs. Enter only what you’d truly lose — lower insured trip cost means a lower premium.
    3. Compare at least three quotes. Marketplaces like Squaremouth plus direct quotes from underwriters like Allianz Travel Insurance can differ by 30%+ for identical coverage.
    4. Read the exclusions, not the marketing. The “covered reasons” list is the entire contract. Confirm your specific worry is covered before paying.
    5. Consider an annual plan if you fly monthly. At 4+ trips a year, an annual multi-trip policy ($250–$450) usually beats per-trip pricing.

    Conclusion

    So, is travel insurance worth it for domestic US flights? Usually no — except when it very much is. For the average $200 flight and refundable hotel, you’re protecting money that was never really at risk, especially once DOT airline obligations and credit card benefits are factored in. But when the trip involves thousands of non-refundable dollars, hurricane-season timing, fragile health, or a once-in-a-lifetime event, a $40–$100 policy is one of the highest-value purchases in travel. The five-minute test: total up what you’d truly lose if the trip collapsed tomorrow, check what your credit card already covers, and buy only if there’s a real gap. For more practical travel guidance, browse our travel section, and if you’re weighing a specific trip, reach out to our newsroom — we’re glad to help you think it through.

    Frequently Asked Questions

    Does travel insurance cover airline flight cancellations?

    Only indirectly. If the airline cancels, federal rules already require a refund, so insurance adds little. It mainly covers cancellations you initiate for covered reasons (illness, emergencies), plus extra costs like unused hotel nights the airline won’t pay for.

    How much does domestic travel insurance cost?

    Expect 4–8% of your insured trip cost: roughly $40–$80 on a $1,000 trip, $120–$240 on a $3,000 trip. Annual multi-trip plans for frequent flyers run $250–$450 per year.

    Can I buy travel insurance after booking?

    Yes, any time before departure. But buying within 14–21 days of your first payment unlocks pre-existing-condition waivers and “cancel for any reason” upgrades, so earlier is better.

    Does my health insurance cover me on domestic trips?

    In nearly all cases, yes — US health plans cover emergency and standard care in all 50 states. Travel medical coverage is mostly redundant domestically unless you’re uninsured or on a very high-deductible plan.

    What is the biggest mistake people make with domestic travel insurance?

    Insuring refundable bookings. If your hotel cancels free and your ticket is changeable, that money was never at risk. Total up only truly non-refundable, non-changeable costs before getting a quote.

  • What Is the Cheapest Way to Meal Prep for One Person

    What Is the Cheapest Way to Meal Prep for One Person

    The cheapest way to meal prep for one person is not a fancy system — it is a ruthless little formula: pick two proteins, two grains, and three vegetables each week, buy them at the cheapest store near you, and cook them in one 90-minute Sunday session into mix-and-match components rather than identical containers of the same meal. Done right, a single person can eat well for $35 to $50 a week, which beats the $200-plus most solo eaters spend on takeout and impulse groceries. The solo meal prepper’s real enemies are food waste and boredom, and this guide is built specifically to defeat both.

    Why Meal Prepping Solo Is Different (and Harder)

    Almost all meal prep advice assumes a family of four. Recipes serve six, bulk bags of spinach rot before one person can finish them, and eating the same chicken-and-rice container five days straight makes anyone order pizza by Thursday. Cooking for one has three unique problems: portion sizes do not match store packaging, variety dies fast, and motivation collapses around day four. The fix is component prepping instead of meal prepping — you cook building blocks, not finished meals, and assemble different combinations through the week. Monday’s chicken becomes Tuesday’s tacos, Wednesday’s fried rice, and Thursday’s soup. Same ingredients, four different meals, zero boredom. If you enjoy practical everyday guides like this one, browse our food section for more.

    The Real Cost Math: What Solo Meal Prep Actually Saves

    Let us run honest numbers. The average American spends roughly $3,500 a year on food away from home, and single-person households spend more per person than any other household size because there is nobody to split bulk costs with. A realistic solo meal prep week — built on the formula below — costs $35 to $50 in groceries for 14 to 18 meals, which works out to about $2 to $3 per meal. Compare that to $12 to $18 per takeout order. Even if you only replace half your takeout meals, you keep $150 to $250 a month. Over a year, that is $1,800 to $3,000 back in your pocket — real money, from about 90 minutes of cooking a week. The USDA’s MyPlate resources can help you keep those cheap meals nutritionally balanced while you are at it.

    The Cheapest Grocery Strategy for One

    Where you shop matters as much as what you cook. Aldi, Lidl, Walmart, and ethnic grocery stores consistently undercut standard supermarkets by 20 to 40 percent on produce, rice, beans, and spices — and their smaller package sizes suit solo shoppers. Buy frozen vegetables freely; they are nutritionally equal to fresh, cost less, and do not rot. Dried beans and lentils cost pennies per serving versus canned. Buy spices at ethnic markets or bulk bins where a bag costs a dollar instead of six. And shop from a list built on your prep plan — impulse buys are where solo grocery budgets die.

    The Sunday 90-Minute Session: A Step-by-Step Plan

    Here is the actual workflow. Total active time: about 90 minutes, most of it waiting while things cook.

    1. Start the slow things first (0:00). Get rice or grains going in a pot or rice cooker, and put eggs on to hard-boil. These need no attention once started.
    2. Roast the vegetables (0:10). Chop two sheet pans of vegetables — whatever was cheap this week — toss with oil, salt, and spices, and get them in a 425°F oven. One pan savory (broccoli, carrots, onions), one pan sweet (sweet potatoes, bell peppers).
    3. Cook the proteins (0:20). While vegetables roast, cook your two proteins: for example, a tray of chicken thighs in the oven’s second rack and a pot of seasoned ground turkey or lentils on the stove. Season the two proteins completely differently — this is what creates variety later.
    4. Prep the fresh components (0:40). While everything cooks, wash and chop raw vegetables, make a quick sauce or dressing (a peanut sauce, a vinaigrette, or salsa — one sauce transforms everything), and portion snacks.
    5. Cool, portion, and store (1:15). Let everything cool before sealing — hot food in containers creates condensation and soggy results. Store components separately, not as assembled meals: one container of grains, one of each protein, one of each vegetable, sauce in a jar.

    That is the whole system. Ninety minutes, one grocery trip, and your refrigerator becomes a personal assembly station for the week.

    The Mix-and-Match Matrix: 5 Days, Zero Repeats

    Here is where component prepping beats traditional meal prep. With two proteins, one grain, roasted vegetables, and a sauce, you can build a genuinely different dinner every night:

    • Monday: Grain bowls — rice, chicken, roasted vegetables, drizzled with sauce.
    • Tuesday: Tacos or wraps — same chicken shredded into tortillas with raw veggies and salsa.
    • Wednesday: Fried rice — grain, diced protein, and vegetables tossed in a hot pan with soy sauce and a scrambled egg.
    • Thursday: Soup or stew — simmer leftover vegetables and protein in broth with canned tomatoes for 20 minutes.
    • Friday: Loaded salad or “clean out” bowls — everything remaining, arranged over greens, sauce on top.

    Lunches run on the same components in different ratios. Breakfast stays simple all week: hard-boiled eggs, oatmeal, or yogurt prepped in jars. Nothing repeats, nothing gets boring, and you cooked exactly once.

    Killing Food Waste: The Solo Prepper’s Real Budget Killer

    For one person, wasted food is usually a bigger budget leak than expensive ingredients — single-person households waste the most per capita. Three habits fix most of it. First, the “eat me first” box: one clear container in the fridge holding anything that must be eaten in two days. Check it before cooking or ordering anything. Second, freeze in single portions: soups, grains, and proteins all freeze beautifully individually, building a backup library for weeks you skip prepping. Label everything with the date; mystery containers get thrown away. Third, plan one weekly “scrounge meal” — Friday’s clean-out bowl exists to rescue stragglers before they spoil. The EPA’s food waste reduction tips have more strategies if waste is your weak spot.

    The cheapest meal prep is not about extreme couponing or eating sadness — it is about eliminating the two taxes solo eaters pay: the takeout tax and the food-waste tax. Cook components once a week, mix and match them into different meals, freeze what you cannot eat in time, and a single person eats well for $35 to $50 a week. The system is boring. The savings are not.

    Conclusion

    The cheapest way to meal prep for one person is the component system: two proteins, two grains, three vegetables, one 90-minute Sunday session, and a refrigerator full of building blocks instead of identical sad containers. Shop at discount and ethnic stores, lean on frozen vegetables and dried beans, kill food waste with an “eat me first” box and single-portion freezing, and assemble different meals all week from the same ingredients. You will spend $35 to $50 a week, save $150 to $250 a month versus takeout, and actually look forward to your food. Start this Sunday — buy the groceries Saturday, cook Sunday morning, and by Sunday night you will have a week of meals and a brand-new habit. Questions about our guides? Read about who we are or get in touch.

    Frequently Asked Questions

    How long does meal-prepped food last in the fridge?

    Cooked meats and prepared meals are safe for 3 to 4 days refrigerated at 40°F or below, per FoodSafety.gov guidelines. Eat refrigerated preps by Thursday and rely on freezer portions for Friday and beyond.

    What if I get bored eating prepped food?

    That is why this guide recommends component prepping. Identical containers breed boredom; mix-and-match components let you build tacos one night, fried rice the next, and soup after that from the same Sunday cook. One sauce change makes the same ingredients taste completely different.

    Is frozen produce really as healthy as fresh?

    Yes. Vegetables are typically frozen within hours of harvest, locking in nutrients — studies show frozen produce is nutritionally comparable to fresh. For a solo prepper, frozen vegetables have the added advantage of zero spoilage.

    How do I start if I barely know how to cook?

    Start smaller: one grain, one protein, one vegetable, one sheet pan. Roasting vegetables and baking chicken thighs are nearly impossible to mess up — toss with oil and salt, 425°F, 25 minutes. Master that, then add components as confidence grows.

    Can I meal prep without a microwave to reheat?

    Absolutely. A toaster oven reheats roasted components better than a microwave, and a skillet with a splash of water revives grains and proteins in minutes. Many prepped components — grain bowls, salads, wraps — are designed to be eaten cold anyway.

  • How to Stop a Puppy From Biting Hands During Play

    How to Stop a Puppy From Biting Hands During Play

    Your puppy is not being aggressive — those needle teeth on your hands are completely normal. Puppies explore the world with their mouths, and biting during play is how they learn bite inhibition: the essential skill of controlling jaw pressure. In a litter, puppies learn this from each other — bite too hard, and the playmate yelps and walks away. Your job is to become that playmate. The method is simple and takes about two to four weeks: the moment teeth touch skin, play stops immediately. Every time. Here is exactly how to do it.

    Why Puppies Bite Hands (It Is Not Dominance)

    Forget the old “dominance” theories — veterinary behaviorists have retired them. Puppies bite hands for three straightforward reasons. First, teething: between roughly 12 and 24 weeks, puppy teeth fall out and adult teeth come in, and chewing soothes sore gums. Second, play: puppies wrestle with littermates using their mouths, and your wiggling hands look like the world’s best toy. Third, attention: if nipping ever made you squeal or wave your hands around, your puppy learned that teeth make exciting things happen. None of this is aggression — true aggression in an 8-to-16-week-old puppy is extremely rare. The American Kennel Club’s puppy training resources explain the developmental stages behind mouthing.

    The Core Method: Teeth on Skin Means Fun Ends

    This is the technique veterinary behaviorists recommend, and it mirrors exactly what littermates do. The rule is absolute: the instant your puppy’s teeth touch your skin, all play stops. Here is the sequence:

    1. Mark it. Let out a short, high-pitched “ouch!” or “yip!” — not a scream, just a sharp sound that startles mildly, the way a littermate would yelp.
    2. Withdraw. Immediately pull your hands away, tuck them under your arms or stand up, and turn slightly away. Become boring. No eye contact, no talking, no pushing the puppy away (pushing looks like more play).
    3. Wait 20 to 30 seconds. Let the energy drain out of the moment. This short timeout teaches the cause and effect: teeth = the fun evaporates.
    4. Resume calmly. Offer a toy instead of your hand and restart gentle play. If the puppy bites again, repeat — same sequence, no anger, no variation.
    5. Escalate calmly if needed. If a puppy bites three times in one session, end play entirely for a few minutes. Put the puppy in a pen or step behind a baby gate. The message scales up: persistent biting ends all fun, not just this round.

    The magic is in the consistency. Every person in the household must follow the same rule, because a puppy that learns “teeth end play with Mom but start a wrestling match with Dad” learns nothing at all. Hold a five-minute family meeting and agree on the exact sequence.

    Redirect: Give Those Teeth a Legal Target

    Stopping the biting is only half the job — a puppy with no chewing outlet will invent one, usually your furniture or ankles. Keep a toy within arm’s reach during the mouthy months. The moment the puppy gets revved up, stuff a rope toy, rubber chew, or stuffed toy into their mouth before teeth find your hand. Praise and keep playing when the puppy chews the toy — you are teaching “this is what teeth are for.” Frozen carrots, frozen washcloths (supervised), and rubber toys with a smear of peanut butter soothe sore gums. Rotate toys every few days; a toy unseen for a week is practically new. The ASPCA’s guide to mouthing and nipping has excellent redirection recommendations.

    What NOT to Do: Common Mistakes That Backfire

    Good intentions cause most training failures. Do not hold the puppy’s muzzle shut — it frightens them and teaches nothing. Do not alpha-roll or pin the puppy down; confrontational techniques increase fear and can create the aggression you are trying to prevent. Do not yell or swat — big dramatic reactions are thrilling, which rewards the biting. Do not yank your hand away fast and keep playing, because fast-moving hands trigger chase instinct. And do not rely on bitter sprays; they punish without teaching the alternative. The American Veterinary Medical Association advises positive, reward-based methods for exactly these reasons. Stay boring when teeth appear, stay fun when toys appear — that contrast is the whole lesson.

    Manage the Environment: Set Your Puppy Up to Succeed

    Training works fastest when the puppy is not constantly rehearsing the bad habit. An overtired puppy bites more — puppies need 18 to 20 hours of sleep daily, and a bitey evening puppy is often just an exhausted one that needs a crate nap. A bored, under-exercised puppy bites more too; age-appropriate play, short training games, and sniff walks burn off the energy that becomes mouthiness. Watch for the evening “witching hour” — schedule a long-lasting chew or stuffed frozen toy right before it, and you will preempt the worst of it. Management is not cheating; it is smart training.

    Teach the Alternative: Reward Four Paws and Gentle Mouths

    Catching your puppy being good matters as much as stopping the bad. When your puppy licks instead of bites, say “yes!” and reward. When they grab a toy unprompted during exciting moments, celebrate it. Teach a solid “sit” early — a puppy sitting for greetings cannot simultaneously jump and mouth, and it gives you something to ask for instead of just saying “no.” Hand-feed part of meals as training treats, rewarding calm mouth behavior; this builds a strong association between your hands and gentle experiences. Puppies repeat what pays — make gentleness the highest-paying behavior in the house.

    When Biting Might Be Something More

    Normal puppy biting happens during play or excitement, the puppy is otherwise happy and wiggly, and it steadily decreases over weeks of consistent training. Talk to your veterinarian or a certified professional dog trainer (look for CPDT-KA credentials) if biting comes with stiff body language, growling over resources, or snapping when handled; if a puppy past six months is getting worse instead of better; or if training is not denting repeated broken skin. These are uncommon, but professional eyes catch things owners miss. Cornell University College of Veterinary Medicine is a trustworthy starting point for understanding when behavior crosses from normal to concerning.

    The entire training program fits in one sentence: teeth on skin ends the fun, teeth on toys continues it. Puppies do not need punishment, dominance, or complicated techniques — they need every human in the house to enforce that one rule with total consistency for two to four weeks. The puppy is not giving you a hard time; the puppy is having a hard time learning, and your consistency is the lesson.

    Conclusion

    Stopping a puppy from biting hands during play comes down to speaking their language: the moment teeth touch skin, yelp, withdraw, and let play die for thirty seconds — exactly as a littermate would. Redirect that mouthy energy onto toys and frozen chews. Skip the muzzle-grabbing, yelling, and alpha rolls; they backfire. Manage sleep and exercise so the puppy is not rehearsing bad habits overtired, reward every gentle interaction, and get the whole household on the same page. Most puppies turn the corner within two to four weeks. Stay patient, stay boring when teeth appear, and enjoy watching your land-shark grow into a gentle-mouthed companion. For more practical pet guides, visit our pets section, and read about the team behind these guides — or tell us how your puppy’s training is going.

    Frequently Asked Questions

    At what age do puppies stop biting?

    Most puppies bite noticeably less by 4 to 5 months as adult teeth finish coming in, and the habit typically resolves by 6 to 8 months with consistent training. Without training, some dogs carry mouthy habits into adulthood.

    Should I yelp when my puppy bites me?

    A short, high-pitched “ouch” works for most puppies because it mimics littermate feedback. But if yours gets more excited by the sound, skip it — for those pups, silent withdrawal is more effective. Match the technique to your puppy.

    Is it okay to let my puppy chew on my fingers gently?

    Better not to. Allowing gentle mouthing teaches the puppy that human skin is an acceptable chew texture, and “gentle” scales up as jaw strength grows. Redirect to toys every time so the rule stays black and white.

    My puppy bites my kids’ ankles and clothes. Is that different?

    Same herding-and-play instinct, but it needs firmer management: kids run, squeal, and flail, which all look like invitations. Supervise closely, teach kids to “be a tree” (stand still, arms folded) when the puppy gets mouthy, and redirect to toys. Never leave young children unsupervised with a mouthy puppy.

    Do bitter apple sprays work to stop biting?

    They can deter some puppies from chewing specific objects, but they are a poor primary strategy for hand-biting: they punish without teaching, wear off quickly, and some puppies do not mind the taste. Training the “teeth end fun” rule addresses the actual behavior.

  • Why Do I Get Headaches Every Afternoon at My Desk Job

    Why Do I Get Headaches Every Afternoon at My Desk Job

    If your head starts pounding like clockwork around 2 or 3 p.m. every workday but feels fine on weekends, your job is almost certainly the trigger. Afternoon desk-job headaches are one of the most common office complaints, and they usually come from a short list of everyday culprits: dehydration, eye strain, poor posture, skipped meals, too much caffeine too early, or stale office air. The pattern is the clue — a headache that arrives on schedule, fades after work, and disappears on days off is your body filing a specific complaint. Here is how to decode it and fix each cause.

    First: Know When a Headache Needs a Doctor, Not a Desk Fix

    Before anything else, get the serious stuff out of the way. Most afternoon headaches are benign, but see a doctor promptly if your headaches are sudden and severe (“the worst headache of your life”), come with vision changes, slurred speech, weakness, confusion, or a stiff neck, or if the pattern recently changed — new headaches after age 40, headaches that wake you from sleep, or headaches that keep getting worse week after week all deserve medical attention. This article covers the common, everyday, pattern-driven headaches of desk work. If anything here does not fit your symptoms, or if over-the-counter painkillers are becoming a daily habit, talk to your primary care doctor. The Mayo Clinic’s headache overview is a solid reference for sorting headache types.

    Cause #1: Dehydration (The 2 P.M. Classic)

    This is the number one suspect, and the easiest to test. You have coffee at 8 a.m., maybe another at 10, and then nothing but dry office air until late afternoon. Caffeine is mildly diuretic, air-conditioned offices are dehydrating, and by mid-afternoon your fluid deficit catches up — headache included. The fix is almost embarrassingly simple: keep a large water bottle at your desk and finish it by lunch, then refill and finish it again by the end of the day. If plain water bores you, add lemon or cucumber. Do not try to catch up by chugging a liter at 3 p.m. when the headache hits; steady sipping through the morning is what prevents it. Give this experiment one full workweek before judging — most people are surprised how much changes.

    Cause #2: Eye Strain From Your Screen Setup

    Your eyes work harder than you think during an eight-hour screen day, and eye strain is a notorious headache factory. The usual problems: a monitor too close or too low, brightness cranked far above the room’s ambient light, tiny text you are squinting at, and glare from a window behind you. Fix the ergonomics first — the top of your screen should sit at or just below eye level, about an arm’s length away. Match your screen brightness to the room, and bump up text scaling instead of leaning in. Then adopt the 20-20-20 rule recommended by eye doctors: every 20 minutes, look at something 20 feet away for 20 seconds. It sounds trivial, but it breaks the sustained focusing effort that builds into a headache by afternoon. The American Academy of Ophthalmology has detailed guidance on screen-related eye strain.

    Cause #3: The Posture Problem

    By mid-afternoon, most desk workers have melted into the “desk slump”: chin jutting forward, shoulders rounded, neck craned toward the screen. That posture loads the small muscles at the base of your skull, and tension there refers pain straight into the classic band-around-the-forehead tension headache. If yours creeps in after hours of hunching and eases when you move, posture is a prime suspect. Quick fixes: raise your monitor so you are not looking down, keep the keyboard close so shoulders stay relaxed, and stand, roll your shoulders, and tuck your chin for thirty seconds every hour.

    Cause #4: The Blood Sugar Rollercoaster

    Skipped breakfast, a pastry at 10 a.m., nothing until a heavy fast-food lunch at 1 — then the headache rolls in at 3. Sound familiar? Big blood sugar swings are a well-known headache trigger. Watch for headaches arriving a few hours after a carb-heavy meal or after skipping one entirely. The fix is steadier fuel: protein in the morning, a balanced rather than enormous lunch, and a sustaining desk snack — nuts, cheese, or peanut butter crackers beat the vending machine. Try two weeks of regular, protein-anchored meals and watch the pattern. The CDC’s healthy eating resources cover the basics of steadier daily nutrition.

    Cause #5: Caffeine Timing Gone Wrong

    Caffeine is a double agent. Your morning coffee constricts blood vessels and masks fatigue; when it wears off around early afternoon, the rebound can trigger a withdrawal-style headache — especially if you drink a lot, drink it early, and drink nothing after noon. The tell: the headache eases suspiciously fast when you have another coffee. You do not have to quit caffeine, but smooth out the curve: cap your total intake, avoid the giant single morning dose, and stop caffeine by early afternoon so it does not wreck your sleep either (poor sleep being yet another headache trigger). If you decide to cut back, taper gradually over a week or two — quitting cold turkey guarantees the very headaches you are trying to prevent.

    Cause #6: Stale Air and Glare

    Sometimes the culprit is the building. Poorly ventilated offices let carbon dioxide build up through the day, and elevated CO2 is a documented headache trigger — one reason headaches peak in stuffy afternoon meeting rooms. Flickering fluorescents, screen glare, and a coworker’s strong fragrance join the lineup. You cannot rebuild the HVAC, but you can step outside for fresh air mid-afternoon, reposition your monitor away from glare, and run a small desk fan. Note where you are when headaches start — desk, conference room, or everywhere — to isolate environmental causes fast.

    How to Find Your Personal Trigger: The Two-Week Log

    With six plausible causes, guessing is inefficient. Instead, run a two-week experiment: each afternoon, jot down what time the headache started, how bad it was on a 1-to-10 scale, what you ate and drank, and where you were sitting. One line a day. Patterns jump out fast — headaches only on days you skipped breakfast, only in the afternoon meeting room, only after three morning coffees. Once you spot your pattern, fix that one thing for two weeks and watch. Most people find one dominant trigger and one minor contributor.

    The afternoon headache is rarely random — it is a schedule, and schedules have causes. Dehydration, eye strain, posture, blood sugar swings, caffeine rebound, and stale office air explain the overwhelming majority of desk-job headaches. Log your pattern for two weeks, fix the likeliest culprit first, and most people see the headaches fade without a single pill.

    Conclusion

    Headaches that arrive every afternoon at your desk job are your body’s way of flagging something fixable: not enough water, a screen straining your eyes, hours of slumped posture, meals that spike and crash your blood sugar, caffeine wearing off, or air that has gone stale by 3 p.m. Rule out the warning signs that need a doctor, then work the list — hydrate steadily, fix your screen ergonomics, move hourly, eat regularly, smooth out your caffeine, and get some fresh air. Keep the two-week log so you are solving your actual trigger instead of guessing. The afternoon headache is one of the most solvable problems in office life. Your head will thank you by about Wednesday. If you found this helpful, learn more about who writes our health guides or share your own experience with us.

    Frequently Asked Questions

    Why do my headaches always start around 2 or 3 p.m.?

    Mid-afternoon is when the day’s small deficits converge: morning dehydration peaks, caffeine wears off, eye and neck strain accumulate, and blood sugar dips after lunch. Stacked together at 2 p.m., they very often trigger a headache.

    Can dehydration really cause a headache?

    Yes — it is one of the most common and underestimated triggers. Even mild dehydration causes headaches, fatigue, and poor concentration. Office workers are especially prone thanks to air conditioning, coffee, and forgetting to drink during busy mornings.

    Are blue-light glasses worth it for headaches?

    The evidence is mixed. Blue light from screens has not been shown to cause eye damage, and the glasses have limited proof for headache prevention. Proper screen distance, brightness, text size, and regular breaks have far stronger evidence — fix those first.

    When should I worry about daily headaches?

    See a doctor if headaches are new and persistent, changing in pattern, severe, or accompanied by neurological symptoms (vision changes, weakness, confusion, slurred speech) — or if you need painkillers most days, which can itself cause rebound headaches.

    Will a standing desk fix my headaches?

    It can help if posture is your trigger, since standing makes slumping harder — but it is not magic. People who stand with the same forward-head posture get the same headaches. Ergonomics, movement breaks, and hydration matter more than the desk.

  • How Much Should I Save From Each Paycheck in My 20s

    How Much Should I Save From Each Paycheck in My 20s

    The short answer: aim to save 20 percent of every paycheck in your 20s — 15 percent toward retirement and about 5 percent toward short-term goals and emergencies. If 20 percent sounds impossible on your current salary, start with whatever you can manage, even 5 percent, and raise it by one percentage point every time you get a raise. The reason this matters so much in your 20s has nothing to do with discipline and everything to do with math: money you save at 25 has forty years to compound, which makes every dollar you save now worth roughly five to seven dollars saved in your 40s. This guide breaks down exactly where that money should go, in what order, and how to make it automatic.

    Why Your 20s Are the Most Powerful Saving Decade

    Compound growth is the closest thing to magic in personal finance. Save $300 a month starting at 25 at a realistic 7 percent average annual return, and you will have about $720,000 by 65. Start the same habit at 35 and you end up near $340,000 — less than half, for only ten fewer years of saving. The early dollars do the heaviest lifting because they compound the longest. That does not mean starting at 28 instead of 23 ruins anything; it means every year you wait has a real, measurable cost.

    The 20 Percent Target — and What to Do If You Cannot Hit It

    Financial planners have recommended the 50/30/20 budget for years: 50 percent of take-home pay for needs, 30 percent for wants, 20 percent for savings and debt payoff. It is a target, not a pass-fail test. If you are earning $38,000 in a high-cost city, 20 percent may genuinely not fit — and that is fine. What matters is the direction and the habit. Save 8 percent this year, bump it to 10 when you get a raise, and keep climbing. People who save through payroll deductions barely notice the money is gone, while people who save “whatever is left” at month’s end save almost nothing. Automate first, adjust the percentage second.

    Where Your Savings Should Go, In Order

    Not all savings are equal. Dollars have jobs, and they should be hired in the right order. Here is the priority stack most financial planners recommend for someone in their 20s:

    1. A starter emergency fund of $1,000. Before anything else, park one thousand dollars in a separate savings account. This is not an investment — it is a shock absorber that keeps a car repair or medical bill from landing on a credit card at 24 percent interest.
    2. High-interest debt payoff. Credit card balances and payday loans first. Paying off a 22 percent credit card is a guaranteed 22 percent return, which beats every investment on earth. Money earmarked here counts as part of your 20 percent.
    3. A 401(k) up to the employer match. If your job offers a 401(k) match — say, 50 cents on every dollar up to 6 percent of your salary — contribute at least enough to capture the full match. Turning down the match is turning down a 50 percent instant return.
    4. A full emergency fund of 3 to 6 months of expenses. Once the match is captured, build the emergency fund up to cover three to six months of essential spending, kept in a high-yield savings account.
    5. Roth IRA contributions. In your 20s you are likely in a lower tax bracket than you will ever be again, which makes the Roth IRA — where you pay tax now and never again — especially powerful. The IRS publishes the current annual contribution limits for IRAs each year.
    6. Back to the 401(k) beyond the match. Once the Roth IRA is maxed, increase 401(k) contributions toward the overall 15 percent retirement target.

    How Much Goes Where: A Paycheck Walkthrough

    Let us make this concrete. Suppose you take home $2,400 every two weeks — about $62,000 a year before taxes. Twenty percent is $480 per paycheck, or roughly $960 a month. A sensible split once you are past the starter phase might look like this: $290 per paycheck into the 401(k) (12 percent, capturing the full employer match and then some), $115 per paycheck into a Roth IRA (which annualizes to about $3,000 a year — you can raise it as income grows), and $75 per paycheck into a high-yield savings account for the emergency fund and short-term goals. Every dollar has an address before the paycheck even lands. If 20 percent does not fit yet, keep the same order and shrink the amounts — the priority stack matters more than the total.

    Making It Automatic: The System That Beats Willpower

    Willpower is a terrible savings strategy. The people who save consistently are not more disciplined — they just removed the decision. Set your 401(k) contribution through your employer’s benefits portal so it comes out before you ever see it. Schedule an automatic transfer to your Roth IRA and your savings account for the day after payday. Keep the savings account at a different bank from your checking account so transfers take a day or two — that small friction kills impulse raids. Then adopt the “raise rule”: every time your pay increases, direct half the raise to savings and keep half for yourself. You still feel the reward of earning more, but your savings rate climbs on autopilot. If money is tight right now, start with whatever percentage fits and raise it with every raise — the habit matters more than the starting number.

    The 20s-Specific Traps That Eat Paychecks

    Your 20s come with spending traps that no budgeting app fully captures. Lifestyle creep is the biggest: the promotion from $45,000 to $58,000 somehow leaves the same bank balance, because the apartment, car, and dining-out budget all expanded to fill the gap. Subscription stacking is the quiet one — $12 here, $15 there, and suddenly $80 a month vanishes into services you barely use; audit them twice a year. Then there is the social tax: weddings, group trips, and dinners out with higher-earning friends can quietly cost thousands a year. A simple monthly review — fifteen minutes with your bank statement and a coffee — catches all three.

    The one rule that matters most: save a percentage, not a dollar amount. Ten percent of a $40,000 salary and ten percent of a $90,000 salary both build the habit — and when raises come, a percentage automatically scales your savings up without a single extra decision.

    Conclusion

    How much should you save from each paycheck in your 20s? Target 20 percent: roughly 15 percent toward retirement through your 401(k) and Roth IRA, and 5 percent toward your emergency fund and short-term goals. Follow the priority order — starter emergency fund, high-interest debt, employer match, full emergency fund, Roth IRA, then more 401(k) — and automate every step so willpower never enters the picture. If 20 percent is out of reach today, start where you are and raise it with every raise. Time is the asset your 20s give you for free, and it is the one asset you can never buy back later. Explore more guides in our finance section, learn about our editorial approach, or send us your money questions.

    Frequently Asked Questions

    Is 20% realistic on an entry-level salary?

    For many people, not at first — and that is okay. Start with 5 to 10 percent and raise it by at least one percentage point with every raise. Someone who starts at 8 percent at 24 and reaches 20 percent by 30 still captures most of the compounding advantage of the decade.

    Should I save or pay off debt first?

    Build a $1,000 starter emergency fund, then attack high-interest debt aggressively while still capturing your full 401(k) match. Low-interest federal student loans can be paid on schedule while you invest, since market returns have historically beaten those rates.

    Roth IRA or traditional 401(k) — which first?

    Capture the full 401(k) employer match first — it is free money. After that, the Roth IRA usually wins in your 20s because you are likely in a lower tax bracket now than in retirement. Once the Roth is maxed, add more to the 401(k).

    Where should I keep my emergency fund?

    In a high-yield savings account at an FDIC-insured bank or credit union — currently paying far more than traditional savings accounts. Keep it separate from checking, do not invest it, and do not touch it for anything that is not a genuine emergency. The Consumer Financial Protection Bureau offers free calculators for sizing your emergency fund.

    What if my employer does not offer a 401(k)?

    Open a Roth IRA on your own — anyone with earned income can contribute. Freelancers can look into a SEP IRA or Solo 401(k), which allow much higher limits. The IRS retirement plans page outlines the options.

  • How to Speed Up an Old Laptop Without Buying New Parts

    How to Speed Up an Old Laptop Without Buying New Parts

    If your laptop takes three minutes to boot and stutters with every browser tab, the hardware is almost never the real problem. Most slowdowns come from software clutter piled up over the years: programs launching at startup, a drive stuffed to 95 percent, forgotten browser extensions, and background processes eating memory. Fix those, and a five- or six-year-old machine can feel surprisingly snappy again — often in under an hour, free. Here are the no-cost fixes that actually move the needle, in order of impact.

    Why Your Old Laptop Feels Slower Than It Used To

    Laptops rarely lose raw performance as they age. The processor in your 2019 machine is just as fast today as the day you bought it. What changes is the load: every installed program, every OS update, and every background service adds to the pile. Think of a pickup truck with the same engine but a bed full of crates — it feels slow because of the cargo, not the engine. Add dust clogging the cooling vents, which forces the processor to slow down to avoid overheating, and you get the full slow-laptop experience. The fixes below unload the truck, one crate at a time.

    Before You Touch Anything: Back Up First

    None of these steps should break anything, but take five minutes to protect yourself anyway. Copy your most important files to a USB drive or free cloud account, then create a system restore point on Windows or confirm Time Machine is enabled on a Mac. This turns every step below from a gamble into an experiment you can undo.

    Fix #1: Audit Your Startup Programs

    This is the single biggest win for most people. Every program set to launch at startup eats memory and CPU from the moment you log in. On Windows, press Ctrl + Shift + Esc, open the Startup apps tab, and check the “Startup impact” column. Anything marked High that you do not use daily — old game launchers, printer utilities, chat apps from 2021 — right-click and Disable. You are not uninstalling anything, just stopping the ambush at boot. On a Mac, remove stragglers under System Settings, General, Login Items. Boot times routinely drop from minutes to under a minute here.

    Fix #2: Uninstall the Bloat You Forgot About

    Open your full list of installed programs and scroll slowly. Most old laptops carry surprising cargo: the trial antivirus that came with the machine, duplicate photo editors, toolbars, “helper” apps installed alongside something else, and games you played once. On Windows, go to Settings, Apps, Installed apps, and sort by size to spot the heavyweights. On a Mac, drag unused apps from Applications to the Trash. Rule of thumb: if you have not opened it in six months and it is not a driver or system component, it goes.

    Fix #3: Reclaim Your Disk Space

    A drive more than about 85 percent full slows everything down, because the operating system needs free space for temporary files and updates. On Windows, turn on Storage Sense (Settings, System, Storage), then run Disk Cleanup as an administrator and check system files — old Windows Update files alone can eat 10 to 20 gigabytes. On a Mac, use Storage management to find the biggest hogs, and empty the Trash — deleted files free no space until you do. Keep at least 15 to 20 percent of the drive free.

    Fix #4: Tame Your Web Browser

    For many people, the “slow laptop” is really a slow browser. Cut open tabs first — twenty tabs can consume more RAM than most programs; use bookmarks instead. Then audit extensions and remove anything you do not use weekly, since every extension runs code on every page. Clear cached images and files once, and turn on the browser’s memory-saving mode (Chrome’s Memory Saver under Settings, Performance), which puts idle tabs to sleep automatically.

    Fix #5: Scan for Malware and Junk

    Malware does not always announce itself with pop-ups. Cryptominers and adware can quietly burn 30 percent of your CPU in the background, which feels exactly like “my laptop got old.” Run a full scan with Windows Security (built in and free) or, on a Mac, a reputable on-demand scanner, then run a second-opinion scan with the free version of Malwarebytes. While you are at it, check your browser’s homepage and search engine settings — if they changed without your permission, that is a classic sign of a hijacker. The Federal Trade Commission’s malware guide explains what to look for if anything seems off.

    Fix #6: Turn Off Visual Effects

    Transparency, animations, and shadows look nice, but they tax older graphics chips every second they are on. On Windows, search for “Adjust the appearance and performance of Windows” and select “Adjust for best performance” — or keep it custom and disable just transparency effects and animations. On a Mac, go to Accessibility settings and turn on “Reduce motion” and “Reduce transparency.” You will barely notice the visual difference during real work, but window switching and scrolling will feel noticeably snappier.

    Fix #7: Switch to a High-Performance Power Plan

    Laptops ship with power plans tuned for battery life, which means the processor spends much of its time deliberately underclocked. When you are plugged into the wall, there is no reason to accept that. On Windows, open Settings, go to System, then Power and battery, and set the power mode to Best performance. On a Mac connected to power, make sure “Low power mode” is off. This single setting can unlock 15 to 25 percent more processing speed on some machines — free performance that was sitting there all along.

    Fix #8: Clean the Dust Out of Your Cooling Vents

    Here is the fix nobody thinks of. Over the years, dust mats into the intake vents and fan blades, choking off airflow. The processor then runs hot and deliberately slows itself down to avoid damage — a process called thermal throttling that feels exactly like an aging machine. With the laptop off and unplugged, use short bursts of compressed air to blow dust out of the vents from the outside. Never use a vacuum, which can generate static. Even an external blowout can drop temperatures by ten degrees and end the throttling. Also keep the laptop on a hard, flat surface rather than a bed or couch, which blocks airflow.

    A slow old laptop is usually a cluttered laptop, not a broken one. Startup programs, a full drive, browser bloat, and dust cause the vast majority of slowdowns — and every one of those is free to fix. Start with the startup audit and the disk cleanup; you will likely see the biggest improvement within the first hour.

    Conclusion

    Speeding up an old laptop without spending a dime is not a trick — it is maintenance most of us never do. Audit startup programs, uninstall forgotten bloat, free up disk space, tame your browser, scan for malware, dial back visual effects, switch to a performance power plan, and blow dust out of the vents. Each step is small; together they can make a five-year-old machine feel new. Be honest about the limits: no cleanup will make a 2015 laptop edit 4K video — but for browsing, email, documents, and video calls, these fixes close most of the gap. For more walkthroughs, browse our technology guides, meet the team behind them, or send us your tech questions.

    Frequently Asked Questions

    How much faster will my old laptop actually get?

    Most people see boot times cut in half and noticeably snappier everyday use after the startup audit, disk cleanup, and browser fixes. A genuinely bogged-down machine can feel 30 to 50 percent faster in normal tasks like browsing and office work.

    Is it safe to disable startup programs?

    Yes. Disabling a startup program does not uninstall it — it still works fine when you open it yourself. Leave your antivirus and anything labeled as a driver or system utility alone. If you disable something you needed, just re-enable it in the same menu.

    Will resetting Windows delete my files?

    Not if you choose “Keep my files” — it reinstalls Windows and removes installed programs but preserves your documents and photos. Still, back up important files to an external drive first; a safety net costs nothing.

    Does adding more RAM count as “buying new parts”?

    Technically yes, and this guide sticks to free fixes. But if your laptop has 4GB of RAM and an accessible memory slot, a RAM upgrade is the most cost-effective hardware improvement you can make later. Try the free steps first — many people find they no longer need it.

    Why does my laptop get hot and slow at the same time?

    That is thermal throttling: dust-clogged vents trap heat, and the processor slows itself down to avoid damage. Cleaning the vents with compressed air often fixes the heat and the slowness together. Keep the laptop on a hard, flat surface so airflow stays clear.